Help - Olex2RTZ
Exporting Routes from Olex
- Click on Settings then Save data to storage device.
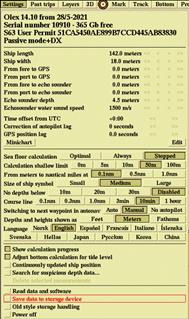
The Select device to save to window should open.
- Click on the device you want to save to.

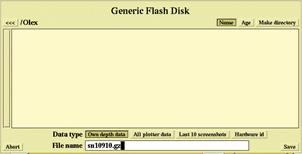
The file browser should open.
Note: Olex requires the device to be formatted in FAT32.
- Navigate to the backup directory, then click on All plotter data.
- Click Save.
Using Olex2RTZ
- Go to the main page of the website.
- Upload your olexplot.gz or .rtz file by clicking on Analyze the file.
- After upload, you will see all routes and waypoints extracted from your file in a table format.
- Select a route from the dropdown menu to preview it on the interactive map.
- Optionally, enable the rename toggle to give your route a custom name before conversion.
- Choose your preferred output format: RTZ (default for .gz files) or GPX (default for .rtz files).
- Click on Convert to download the route in your selected format.
Note: The system automatically detects waypoints and organizes them correctly into a route. If your file contains routes with only one waypoint, you can use the filter toggle to show or hide them.
Advanced Features
Olex2RTZ offers additional options to process different types of navigation data from your files:
Routes
Enable this option to include unnamed routes (routes without a specific name) from your Olex file. These are typically routes that start with "Rute uten navn".
Traces
Enable this option to include trace routes from your Olex file. These are routes that contain "Slepestrek" in their name and represent navigation tracks or trails.
Waypoints
Enable this option to include single waypoints (routes with only one point) from your file. These can be useful for marking specific locations.
Limit Waypoint Table
Enable this option to limit the display of waypoint tables for routes and traces with more than 100 waypoints. When enabled, the table will show only 100 waypoints (keeping the first and last waypoints, plus evenly sampled intermediate points) to improve page loading and readability, while preserving the full waypoint data for map display and conversion. This applies equally to both routes and traces.
How to use: After uploading your file, check the boxes for the types of data you want to process before clicking "Analyze". This gives you more control over what gets converted.
Map Display
The map displays both routes and traces with visual distinctions:
- Routes: Displayed in blue color
- Traces: Displayed in orange color for easy identification